This tutorial will guide you through the steps to set up dump1090 on a linux desktop / laptop system. It has been tested on systems running Linux Mint 17.1 through 17.3 and Siduction 2014.1 (both based on Debian Linux) We are going to do a lot of work using the command line and needing root priveleges. Let us make it easy by going into superuser mode at the start and not repetitively using "sudo". Be careful! As a superuser you can damage your system by executing the wrong command or by making mistakes in your typing of commands. As professional carpenters say: check twice, cut once.
ADS-B is an acronym for Automatic Dependent Surveillance - Broadcast, and refers to the system for monitoring aircraft and providing air traffic control. It differs from conventional secondary radar in that it is the aircraft navigation system which provides the geographic position, altitude, groundspeed, and other data. Secondary radar, on the other hand, relies on an interrogation signal from ground-based air traffic control radar to trigger a transmission from the aircraft, whic also gives a unique identifying code plus altitude data. The mode S transponders providing ADS-B signals are integrated into the flight management system and can provide other details about the aircraft state, including selected heading, selected altitude, and numerous other parameters.
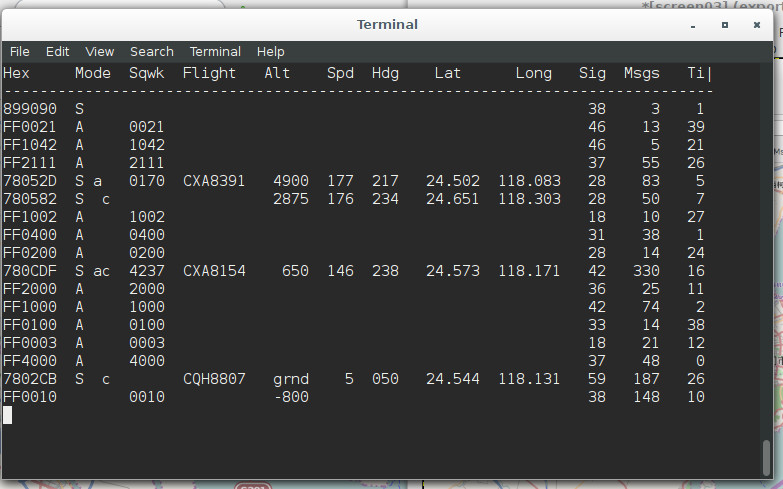
The Dump1090 interactive screen.
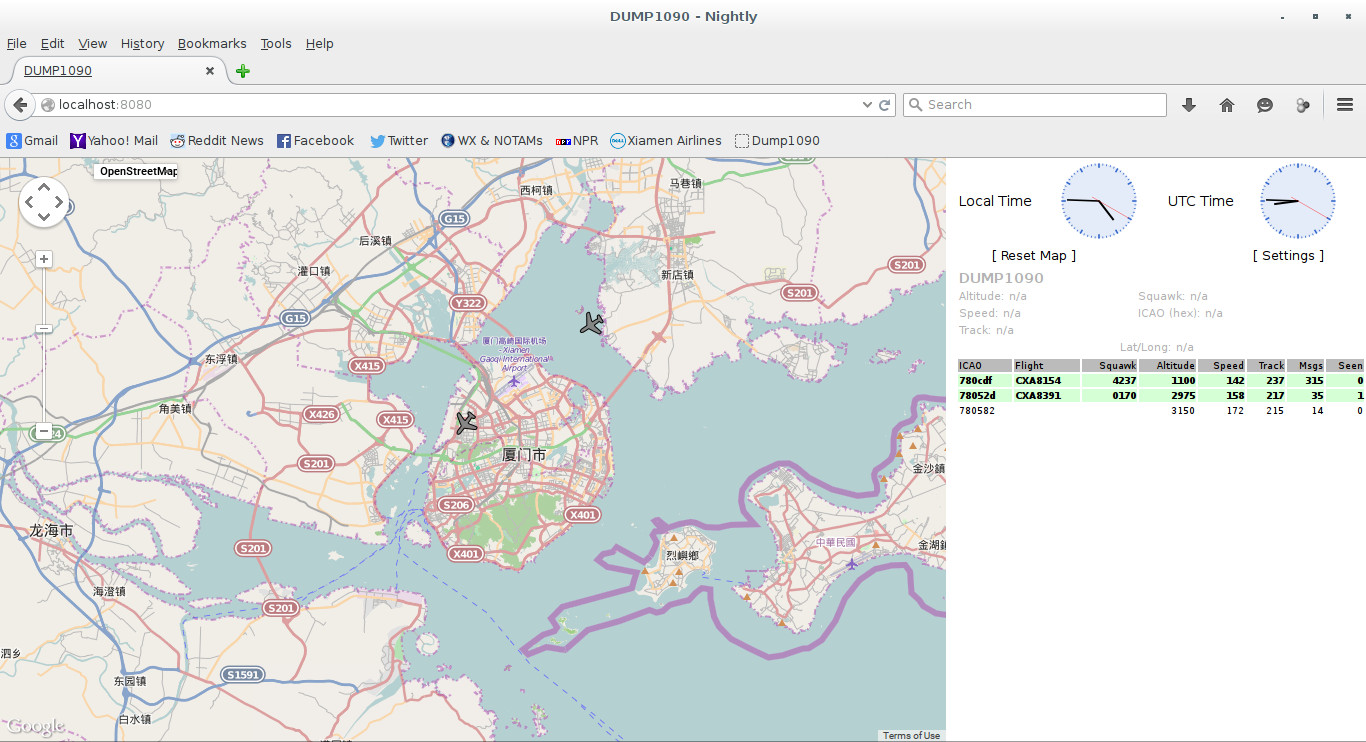
Dump1090 showing traffic around the airport.
It is notable that recent aircraft accidents, such as Asiana 214 and Germanwings 9525 transmitted ADS-B data which was captured by radio networks run by citizens and made available on the internet well before government investigators disclosed their findings. Anyone who wanted to know could access the flight path data for those aircraft and compare it to others that were in a normal situation. Not to say untrained observers could determine probable causes of these accidents, but the ADS-B network provided "transparency" and ensured a higher level of government honesty. There are other crashes where governments ignored investigators and blatantly lied about the causes (Silkair 185 and EgyptAir 990) for political reasons.
Aside from such serious reasons for tracking flights via ADS-B, it can simply be exciting, informative, and fun. It is also inexpensive and technically advanced to use the new RTL-SDR receivers and software like dump1090 for flight tracking.
First Step: Update Your System
Prior to installing dump1090 in Linux Mint 17.1 or Siduction 14.1, it is smart to do a system update and make sure it is not running on outdated packages. Here is where we will begin operating in superuser mode instead of using the sudo command over and over. To enter superuser mode, open a terminal, enter the su command:
~$ su
To indicate that you are now operating with superuser privileges, command prompt should change from a tilde and dollar sign (~$) to the pound sign (#) after the proper root password is entered. Start the process of downloading and installing software by going to the root user's home directory and updating in apt:
# cd ~
# apt-get update
Wait for the repositories to be checked, then upgrade:
# apt-get upgrade
Next, the following steps will create directories and make executable files. If you get lost or interrupted, it is easy to go back to the home diretory with "cd ~" and repeat the steps.
Blacklist the dvb kernel driver which interferes with operating RTL-SDR dongles with dum1090 and other specialist software:
# echo "blacklist dvb_usb_rtl28xxu" >> /etc/modprobe.d/rtl-sdr-blacklist.conf
Install Prerequisite Packages
To get the latest release of dump1090 from the git repositories and install it, c few tools and dependencies must be downloaded:
# cd ~
# apt-get install git cmake libusb-1.0-0.dev build-essential
Install RTL-SDR from Osmocom
Osmocom's RTL-SDR software enables DVB-T USB dongles containing the Realtek RTL2832U chipset to operate as a tunable quadrature sampling detector. A broadband stream of I/Q data, representing a broad chunk of radio spectrum, is sent to the host computer via USB. The Osmocom RTL-SDR package enables specific configuration of the ADC sample rate, oscillator frequency correction, amplifier gain, and other paramaters used by the dump1090 software. Install from Osmocom's git repository:
# cd ~
# git clone git://git.osmocom.org/rtl-sdr.git
# cd rtl-sdr
# mkdir build
# cd build
# cmake ../ -DINSTALL_UDEV_RULES=ON
# make
# make install
# ldconfig
NOTE: It is not absolutely necessary to use the driver provided by Osmocom. There are others, with useful enhancements, which can be substituted. For example you could use the Mutability fork and enjoy better tuning and filtering. Substitute this git command to download the source code:
# git clone git://github.com/mutability/rtl-sdr.git
Download Dump1090
Dump1090 is being actively developed by multiple coders. Mutability and MalcomRobb are two dump1090 forks are doing a particularly good job at implementing useful features and enhancing dump1090's ability to detect aircraft transponder signals. The signals often are weak and subject to interference, resulting in corrupted data. It is possible, using digital signal processing, to recover data bursts which would be lost to lesser quality software. The example here uses Malcom Robb's version. For the Mutability version, which is optimized for Rasberry Pi devices, substitute this url: git://github.com/mutability/dump1090.git. To download, use:
# cd ~
# git clone git://github.com/MalcolmRobb/dump1090.git
# cd dump1090
# make
A Start-Up Script for Dump1090
The make process creates a startup script for dump1090, named dump1090.sh. It is more suitable for running a dump1090 server instance. I chose to rewrite the script to suit my preferences as a desktop user who simply wants to run it and observe air traffic on a map in my web browser. In a text editor, open dump1090.sh and replace the original code with this shorter code:
#!/bin/bash
cd /opt/dump1090/
./dump1090 --net --interactive --aggressive --modeac
After editing,set the script's permissions to executable with the following command:
# chmod +x dump1090.sh
Next, set your geographic coordinates (degrees, decimal format) for display when using the dump1090 interactive map. Open the file dump1090/public_html/config.js. Her is an example using gedit, but you could use kwrite, medit, vim, or another text editor.
# gedit ~/dump1090/public_html/config.js
Find the section for map settings. Enter the proper latitude and longitude and save the file:
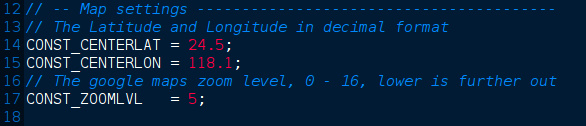
Dump 1090 Map Settings
Copy the whole dump1090 folder to the /opt directory, where it may contain the executable and other files and is less likely be accidentally deleted or modified. You actually must make a deliberate effort to go in there and mangle the files.
# cp -r dump1090 /opt/dump1090/
Create a Dump1090 Menu Entry
Why bother with the command line when it is not always necessary? To enjoy point-and-click convenience with dump1090, create a file called dump1090.desktop. Paste in the following code, and place it in the folder /usr/share/applications:
[Desktop Entry]
Name=Dump1090
GenericName=dump1090
Comment=Mode S SDR
Exec=gnome-terminal -e 'sh /opt/dump1090/dump1090.sh'
Icon=terminal
Terminal=false
Type=Application
Categories=Network;HamRadio;
Note: You can substitute xterm or lxterm for gnome-terminal if you prefer. Also, you can substitute another icon if you would rather have another symbol for dump1090.
A simple way to do it is start the editor and specify the filename, then paste the above code. Save the file to finish creating the start menu entry. In this example, we're still a superuser and use gedit:
# gedit ~/usr/share/applications/dump1090.desktop
Installation and setup is complete! You can now go into your main menu, find the icon for dump1090, and click on it to start the program. A window should open and begin displaying transponder data received by your RTL-SDR dongle. The internal webserver should be running and ready to display data over a map downloaded from Google or Openstreetmap.
Feeding Dump1090 Data to FlightRadar24 and Flightaware
A laptop or microcomputer may be used to run dump1090 and send data to a remote user via wi fi or ethernet using rtl_tcp, which is part of the Osmocom RTL-SDR package. It works for listening in any mode, including ADS-B.
Dump 1090 can be configured to serve data to remote users across the network. Flightradar24.com, Flightaware.com, and a few other websites accept data from independently run ADS-B servers. Some provide downloadable packages for the Rasberry Pi, BeagleBone, and legacy PC hardware running Windows.
One notable networking method with dump1090 is using it to feed FlightAware and FlightRadar24 simultaneously on a Rasberry Pi. These ADS-B sharing sites have numerous users operating their antenna mast-mounted receivers as dual feeds. Note that the method can be adapted to laptops, BeagleBones, and other devices. Here is a way to do it, according to Reddit user thebaldgeek:
First, download and install Flightaware's PiAware and get it properly running. Connect to the machine running PiAware (via SSH or Putty) and download FlightRadar24's package called fr24feed. The ~$ means work as a normal user:
~$ wget http://feed.flightradar24.com/raspberry-pi/fr24feed_1.0.10-3_armhf.deb
~$ sudo dpkg -i fr24feed_1.0.11-3_armhf.deb
~$ sudo fr24feed --signup
Use the current version of fr24feed - 1.0.11-3 is simply the current version as this page is being written. Follow all of the prompts, but do not start the feed.
Next, change certain settings by editing the ini file:
~$ sudo nano /etc/fr24feed.ini
These are the settings to edit. Make sure to use your own password:
receiver="avr-tcp"
fr24key="pasteyourkeyhere"
host="localhost:30002"
bs="no"
raw="no"
logmode="1"
Enter a ctrl+o then ctrl+x to save the file and exit Nano. Then start fr24feed and check its status:
~$ sudo service fr24feed start
~$ service fr24feed status
The status response should look something like this:
[ ok ] FR24 Feeder/Decoder Process: running.
[ ok ] FR24 Stats Timestamp: 2015-04-07 01:11:20.
[ ok ] FR24 Link: connected [UDP].
[ ok ] FR24 Radar: T-KCOE1
[ ok ] FR24 Tracked AC: 6.
[ ok ] Receiver: connected (99664 MSGS/0 SYNC).
FlightRadar24 and Flightaware websites should both show accumulating data statistics and display aircraft picked up by your ADS-B receiver stataion. With feeds up, you will enjoy premium member benefits as well! It is entirely possible to feed more services from an instance of dump1090. It's a matter of getting the data written to a readable file format (such as json or xml) or into tcp data packets, then directing the feeds to read the data.
© 2005 - 2024 AB9IL.net, All Rights Reserved.
About Philip Collier / AB9IL, Commentaries and Op-Eds, Contact, Privacy Policy and Affiliate Disclosure, XML Sitemap.
This website is reader-supported. As an Amazon affiliate, I earn from qualifying purchases.