UPDATE 2026/06/18:There are more new UberSDR sites and conversions from other radio interfaces. From northern Georgia (USA), enjoy the nice reception at the NY4Q Direct Sampling SDR or, from the west coast, the Direct Sampling SDR in Torrance, California .
UberSDR is now front and center for popular internet SDR sites like K3FEF. It seems like yesterday when I found that K3FEF and W3TKP had done some upgrades to their internet connected software defined radio site, setting up an RX-888 receiver and NovaSDR web-based interface. I thought it was a great improvement, as the Rx-888 is a high performance SDR with 16 bit sampling. Not only is it sensitive when barefoot, it receives spectrum cleanly on the site's outdoor antenna and low noise amplifier. NovaSDR has all the features an amateur radio or utility and broadcast listener would want. Today, I visited the site for a listen to NCDXF beacons and found that UberSDR was being used as the radio interface. I like it and think you should give it a try too!
An Introduction to UberSDR
UberSDR is actually more than an interface between SDR equipment and radio listeners. It is actually a full featured platform, part of a system which can manage frequencies, antenna steering, decoding of digital communication modes, and other functions essential to amateur and professional stations. For anyone who simply wants to tune in their favorite broadcasters, maritime or aviation signals, or just dabble in radio, using the web interface is an intuitve and pleasant experience. What follows is a description of the UberSDR controls and indicators, plus some tips and tricks for a better experience.
Loading the UberSDR Interface
Generally, UberSDR sites present an interface arranged similarly to WebSDR and NovaSDR sites. Visit the URL for a receiver site and the interface loads. First, a welcome layer will appear, with a welcome message, small map, and download links, and a start button.

It seems to me that the welcome screen has a dual purpose: to give the user something to see, with basic information and links, while the interface loads and also to screen out bots. Your "proof of work" as a human is to click the start button for access to the main interface.
The Waterfall and Associated Controls
A large spectrum waterfall dominates the upper part of the main interface screen. A frequency scale goes across the waterfall, with a green line indicating the receiver filter passband. Also, a set of dashed vertical lines on the waterfall mark the bounds of the receiver passband. The passband may be adjusted by dragging the passband indicator ends along the frequency scale.

Along the bottom of the waterfall, from left to right, there are buttons for switching between VFOs A and B, zoom, scrolling, etc., ending with an SNR indicator. I found the zoom controls to be very useful. The waterfall does not automatically center on the tuned frequency, but clicking the "@" symbol will center it. A spectrum histogram display may be activated by checking the appropriate box.
Moving the cursor onto the waterfall activates a small information box, which stays just to the right of the cursor. In the box, there are two lines of data showing the frequency and signal level under the pointer, plus the frequency and level of the peak signal. The SDR will tune to the frequency of any spectrum you click on.
Frequency Display, Tuning, and Mode Switching
Immediately below the waterfall display is a row of selector buttons for several bands covered by the SDR. Clicking a button immediately switches to a band and selects the appropriate signal mode. Note that the band select buttons are color coded according to the realtime SNR information for the receiver!

The row of selectors is flanked on the left by a "voice activity" button, which brings up a list of frequencies and modes of voice signals detected by the software. On a busy band, there will be a long list of detections. Clicking the button associated with a detection tunes to the frequency for that detection.
On the right side of the band selectors is a button with a bullhorn icon. It activates a text to speech feature which verbally announces frequency and mode changes.
Below the row of band selectors, centrally located, is the frequency display and mode select panel. On the UberSDRs I visited, the displayed frequency was in bright green over a dark background, and in a larger font than other text. I am a tough critic of frequency displays, as I often tune certain frequencies, then move away from the screen while awaiting comms activity. It is important that I can glance at the screen from across the room and read the frequency; UberSDR does its size. It is not huge, as on other SDRs, but I enjoy the classic look - sort of like rack mount radio gear from the 1990s.
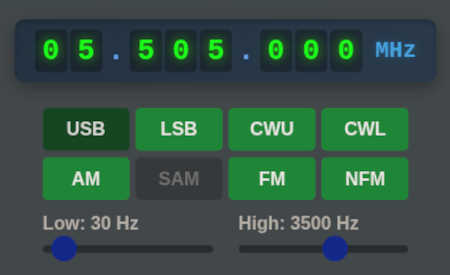
The signal mode select buttons are clicked to set the SDR to the associated mode:upper and lower sideband, AM, FM, narrow FM, cw - upper, and cw - lower. There is also "SAM" for synchronous AM demodulation (yaaay!), although it is disabled due to problems in the current software edition. I am hoping for a fix soon, as all the RX-888s paired with this interface can bring in some excellent broadcast reception, especially during fading or in the presence of interference. Try AM on the sync demodulator - you won't want to bother with envelope detection again.
Below the mode select buttons, there are sliders for adjusting the lower and upper passband edges. Defaults are mostly suitable and may be manually adjusted to fit the spectral content of signals or to cut out interference.
Frequency Entry and Steps
To the left of the frequency display and mode selectors is the frequency entry text field and tuning step buttons. Frequencies may be directly entered into the text box. The SDR may also be tuned by stepping up or down by hitting the arrow buttons under the text box. Steps are set as appropriate for the active signal mode, so the steps are larger for AM and FM than for single sideband.

If you have a scroll wheel on your mouse, or maybe a huge, flywheel equipped external tuning knob made especially for radio geeks, you can use the wheel for tuning up and down the bands. Alternatively, the scroll wheel may be set for zooming the waterfall instead.
Continuing on the left, below the frequency step buttons, are a group of menus, where one may select frequency bands, save bookmarks, or tune to bookmarked frequencies. The bottom menu is for selecting extensions.
The UberSDR Extensions
Several UberSDR extensions are installed by default and may be selected from the bottom menu below the frequency entry and step buttons. These are the extensions presently available:
- CW Spots
- Digital Spots
- DX Cluster
- FSK/RTTY Decoder
- FT4/FT8 Decoder
- Morse Decoder
- NAVTEX Decoder
- SSTV Decoder
- Stats Monitor
- WEFAX Decoder
S-Meter(s)
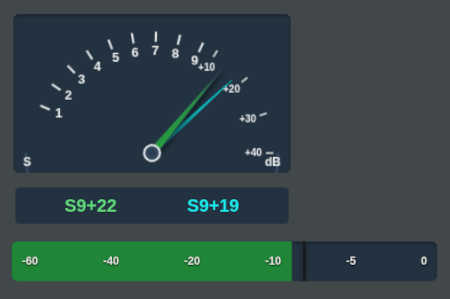
The UberSDR interface is equipped with an analog-like S-meter, with fast and slow needles on a virtual concentric shaft. It is pretty slick! The fast needle rapidly follows changes in signal strength, while the slow needle takes a bit more time to catch up. So, with rapid speech on sideband, or some rapid QSB on AM, the needles split and realign, split and realign, over and over. There is also a digital meter indicating the instantaneous signal strength in dB below full scale (DBFS).
Volume Control, Noise Reduction, and Filtering
Left of the DBFS meter is a row of controls for audio. Starting from the far left, they are the volume slider, L/R channel enablement, mute, noise reduction, noise blanker, EQ, and recorder. Those are to toggle items on or off; actual settings are made in the "Audio Filters" menu near the bottom of the screen.

Audio controls (and signal strength meter).
Extensive audio tweaking is possible with the UberSDR software. It is possible to notch out tones, apply equalization to yellowey slop bucket audio, adjust loudness with audio AGC, and apply noise reduction. You can literally sit at your desktop computer, or use a tablet or smart phone, and make a little SDR thousands of miles away sound like a thousand dollar rack mount rig.
Chat on the SDR
The UberSDR software includes chat functionality. Some sites use it, some do not. I think it is a nifty feature enabling users to send each other messages about signals they are picking up. The caveat for chat is that morons abound, and every now and then they appear in SDR chat boxes. Do your best to not feed the trolls and morons, so that enjoyment of these SDR sites remains high. Internet SDR site operators have been known to add troublemakers to block lists and share them with others...
Discovering UberSDR Receivers Online
You can find running UberSDR sites, with frequent updates at https://instances.ubersdr.org. The site is nicely set up, as there is a map to show where receivers are located and also which areas have day or night conditions. There is also a summary of space weather, so you can know what to expect in terms of radio propagation.
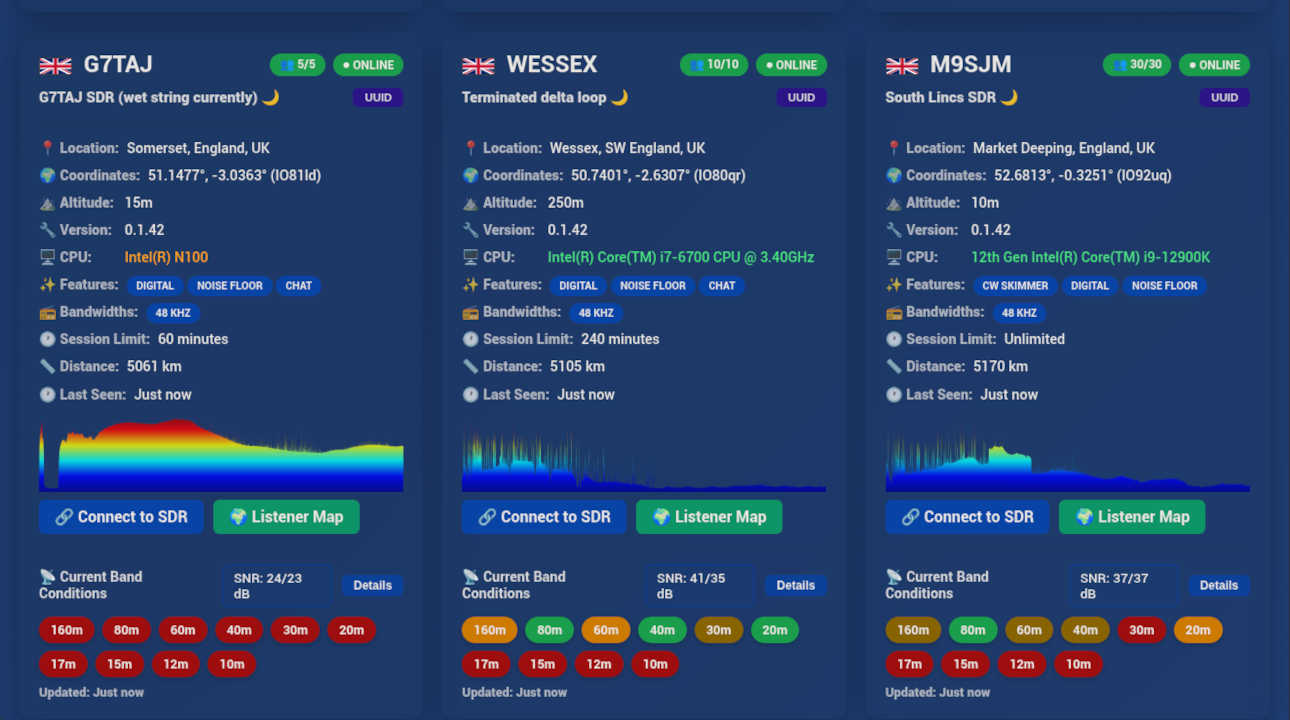
One of the most innovative things about the instances page is the live SNR quality updates. See the data for three SDRs, and note the graphical indication that the higher SNR receivers have more vertical spikes, which represent radio signals well above the background noise. Listen on these receivers whenever possible.

Also make note that high gain amplifiers ahead of the receiver are NOT necessary. The 40+ SNRs are certainly due to the operators driving them up with preamplification. All they really need are ten to fifteen decibels of gain from a device with a low noise figure ("low" meaning 1 dB or better). Also, there is a lot of natural background noise at the lower frequencies, so not only should any preamplification be judicious and low noise, but it should also have a slight amount of selectivity to favor the higher frequencies. Not so much gain is needed for mediumwave, but a few db would certainly help sensitivity above 15 to 20 MHz, where there is a lot less natural noise.
Preview SDRs Before Visiting
I really like the site preview feature for UberSDR sites. It enables visitors to check conditions on frequencies of interest, with actual live audio and signal strength. Consider the scenario in which you are looking for a receiver carrying BBC Radio 4 Longwave, on 198 kHz. Set the frequency and mode, then go to the map and hover over the markers where receivers are located. You will receive an audio stream, immediately revealing how well a site is receiving the signal!

Set the preview frequency and mode first.
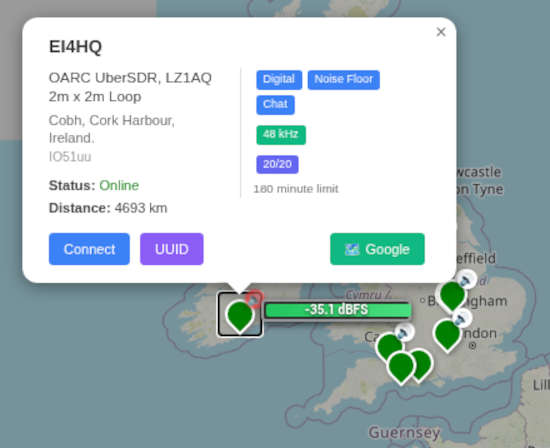
Hover over some UberSDR map markers to hear signal previews.
Try Tuning Some Stations!
From K3FEF, west of New York City, USA:From PD2RPS, northeast of Amsterdam, Netherlands:
From OE3GBB, Wartmannstetten, eastern Austria:
Save Your Own Radio Bookmarks
You can bookmark stations in the UberSDR interface using the bookmarks menu. Also, you can save your favorite stations, including frequencies, modes, waterfall zoom, and filter bandpasses, by getting eveything set up first, then bookmarking the URL as it appears in your browser's address bar. All of that data is encoded into the text string you can see. Note that the frequency appears twice: once to set the tuner and again to set the waterfall.
Summary
UberSDR is an efficient and technologically advanced SDR platform which is in the early stages of its rise. It has great features for casual and experienced radio listeners, which I have covered here. There are a lot of other features pertinent to integrating SDR receivers into a larger context of amateur radio station operation, which you can see on their website and code repository. So, go check them out, tune around the bands, and see what UberSDR might be able to do for your shortwave listening by-way-of-internet.
© 2005 - 2026 AB9IL.net, All Rights Reserved.
Written and curated by Philip Collier / AB9IL.
About Philip Collier / AB9IL, Commentaries and Op-Eds, Contact, Privacy Policy and Disclosures, XML Sitemap.