Updated 04/02/2016: Pulseaudio, Jack Audio / Alsa Loopback Device.
WebSDR and OpenWebRX represent the cutting edge of internet controlled, remotely operated radio receivers. These sites offer sections of radio spectrum to listeners, who can each select their own frequencies and modes. One can listen to upper or lower sideband, AM or CW, and individually adjustable sharp filtering. At any given hour, thousands of listeners are monitoring amateur radio signals from around the world. Listeners enjoy the freedom to select the ideal receiver sites for the local time of day, band of interest, and individual performance of these remotely controlled SDR sites.
One somewhat undeveloped aspect of web based SDR monitoring is digital mode capability. It is not in the scope of a web based SDR site to offer all possible signal modes to all of the global listeners - a site offers a chunk of spectrum for listeners who, with proper software, to do whatever they can imagine. But how does one monitor PSK-31, RTTY, MT63, or other modes when receiving audio from a web based SDR site? What options are available when conditions are poor and not suitable for voice? Imagine listenting on HF to dozens of PSK-31 signals on the 20 meter band. The popular digital mode decoding applications, such as Digipan, Fldigi, or Multipsk, can successfully receive non-voice signals if the audio is internally routed to the software.
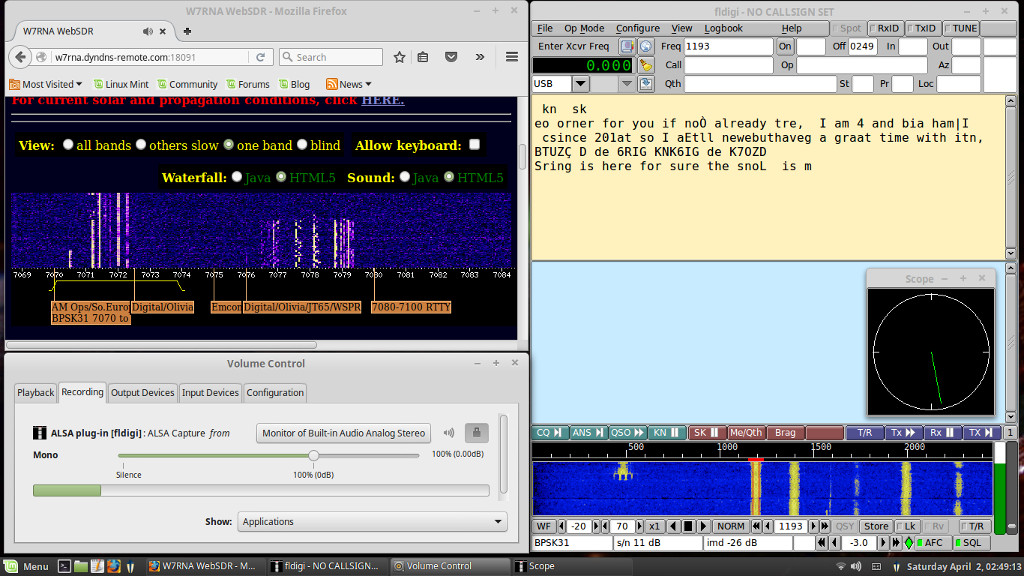
Monitoring PSK-31 via the W7RNA WebSDR site.
Using Pulseaudio
Many users of WebSDR and OpenWebRX sites are on Linux systems such as Ubuntu, Mint, or others which use PulseAudio. PulseAudio internally routes audio between applications and sound devices and is perfect for feeding received SDR audio directly into decoding applications.
Note: If you do not have the Pulse Audio Volume control, get it now using your software
manager or in a terminal with the command:
sudo apt-get install pavucontrol
Then follow these steps:
- Start up the web browser and load the SDR page for the site you want to use.
- Next, open the digimode app - WSJT or Fldigi in this example. If equipped, you may see signals being received by the system microphone at this point, but ignore that!
- In WSJT (or WSJT-X), go into the audio settings and select File > Settings > Audio. Select "alsa_output.pci-0000_00_08.0.analog-stereo.monitor". The monitor on your system may not exactly match the example here, but should be similar.
- In Fldigi, go into the menus at Configure > Sound Card > Audio > Devices. Check "Port Audio" and "default".
- In Fldigi, open the Pulse Audio Volume Control (Pavucontrol). Under the recording tab there will be settings for ALSA Plug-in [fldigi]. In the drop-down list, select audio from "Monitor of Built-in Analog Stereo".
Pulseaudio incorporates a free and easy audio pipe much like the "Virtual Audio Cable" available in Windows. Add this code near the bottom of file /etc/pulse/default.pa to set up two virtual cables for your other audio routing needs:
#Virtual Cables
load-module module-null-sink sink_name=vac1 sink_properties=device.description=VCable1
load-module module-null-sink sink_name=vac2 sink_properties=device.description=VCable2
When the audio routing changes are made, the WSJT or Fldigi waterfall display should show audio from the WebSDR or OpenWebRX site and no noise from the local system microphone.
If you are running a fully installed system (or a liveDVD with persistence), the settings should persist after rebooting the computer. Users operating on frugal installs - booting the iso file (or running from a live system without persistence) will need to adjust the settings manually each time the system is started.
Using Jack Audio and the ALSA Loopback Device
The Jack Audio Connection Kit is a software package which routes audio between applications, and does exactly what is necessary for advanced methods of software defined radio digital mode operation. It acts as an interconnection layer allowing one to use any source of signal data and feed it to or from the proper digital mode software. That means Jack works for both reception and transmission of any of the digital modes.
The ALSA Loopback device functions as a virtual audio interface. Applications send outbound audio to one port of the loop, and it apears at the other end for use by other applications. It is well known that one can record system sounds, streaming audio, or any other audio that passes through the system using the ALSA Loopback device. What is less known is that the loopback can be used to feed signals from a WebSDR site to digital radio mode decoding software. By itself, the loopback is a bit crude. Fldigi is sophisticated enough to take audio from the ALSA loopback interface and decode signals, but at the cost of not actually hearing the audio. It is possible to cobble together more plugins to use with Windows applications using WINE, but the results are not reliable. The loopback needs some help from another layer of software, and that layer is Jack.
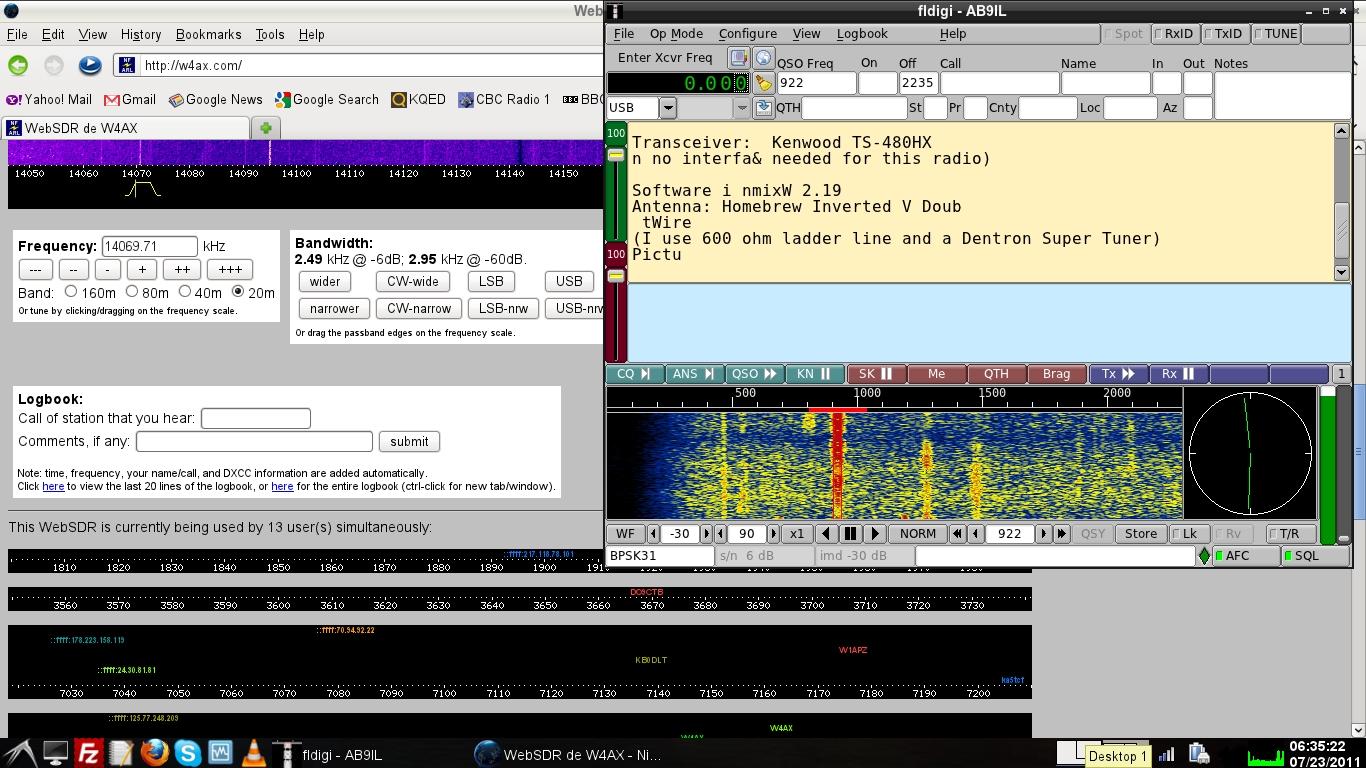
Monitoring PSK-31 via the W4AX WebSDR site.
Obtaining The ALSA Loopback Device
The loopback device is included on most recent Linux systems. Do not waste time struggling with an old distribution that doesn't have the "snd-aloop" module. Any kernel from 2.6.37 or later will have it built in. Another advantage of recently updated Linux distributions is fresh code for ALSA. If, for some reason, it is desired to manually compile and install the aloop driver module, visit the Alsa-Project for the latest source code, instructions, and tips. Also get the alsa-utils package, as it contains useful utilities for testing and manipulating audio in Linux. Shown below are commands for getting packages with apt. Always do an "apt-get update" before trying to download new software.
Alsa-utils is easy to obtain with typical Linux software package managers, and the command line can be used with this entry:
# apt-get install alsa-utils
To load the snd-aloop module for use during a single computing session, use the following code on the command line (as root user):
# modprobe snd-aloop
To load the module automatically at boot time, it is necessary to go into the system configuration files and add it to the list of automatically loaded kernel modules. Edit the file "/etc/modules" (as root) to add the following code:
#Alsa loopback device for clean access to pcm audio
snd-aloop
Installing The Jack Audio Connection Kit
As with other complex software packages, things are easy with a good package manager. Below is the command to use apt for downloading and installing the Jack Audio Connection Kit and any dependencies not already on the computer:
# apt-get install jackd
Configuring the "asound.conf" File
Now that the ALSA loopback device is in the system, it needs to be configured for easy use by Jack and other applications. Configure the system for all users by creating or editing the system file "/etc/asound.conf" where virtual capture and playback plugs will be defined. Put the following code into the file:
# This is asound.conf code for enabling the transfer of
# audio data between alsa applications Jack Audio.

# playback PCM device: using loopback subdevice 0,0
pcm.amix {
  type dmix
  ipc_key 219345
  slave.pcm "hw:Loopback,0,0"
}

# capture PCM device: using loopback subdevice 0,1
pcm.asnoop {
  type dsnoop
  ipc_key 219346
  slave.pcm "hw:Loopback,0,1"
}

# duplex device combining our PCM devices defined above
pcm.aduplex {
  type asym
  playback.pcm "amix"
  capture.pcm "asnoop"
}

# for jack alsa_in and alsa_out: looped-back signal at other ends
pcm.ploop {
  type plug
  slave.pcm "hw:Loopback,1,1"
}

pcm.cloop {
  type dsnoop
  ipc_key 219348
  slave.pcm "hw:Loopback,1,0"
}

# define the default devices
pcm.!default {
  type plug
  slave.pcm "aduplex"
}

pcm.!default  {
type hw
card 0
}
ctl.!default  {
type hw
card 0
}
The code above sets up a computer to use the loopbacks in a much more flexible manner than the ASIO4ALL drivers used on Windows and Mac systems. It is possible to route any audio through Jack to decoders, DSP filters, recorders, or any other software the user can imagine and apply for more effective use of the sound system.
Configuring Jack Audio for Loopback Devices
To properly recognize the ALSA loopback devices, Jack Audio needs to receive certain configuration commands when it is started. The loop2jack script should be placed in the directory /usr/local/sbin and made executable:
#!/bin/sh
# script loop2jack, located in /usr/local/sbin

# loop client creation
/usr/bin/alsa_out -j ploop -dploop -q 2 2>&1 1> /dev/null &
/usr/bin/alsa_in -j  cloop -dcloop -q 2 2>&1 1> /dev/null &

# give it some time before connecting to system ports
sleep 1

# cloop ports -> jack output ports
jack_connect cloop:capture_1 system:playback_1
jack_connect cloop:capture_2 system:playback_2


# system microphone to "ploop" ports
jack_connect system:capture_1 ploop:playback_1
jack_connect system:capture_2 ploop:playback_2

# done
exit 0
Next, start the Jack Control interface and go into the SETUP menu. Navigate to the OPTIONS tab, and check the box "Execute script after Startup." Fill the associated text field with the command:
/usr/local/sbin/loop2jack
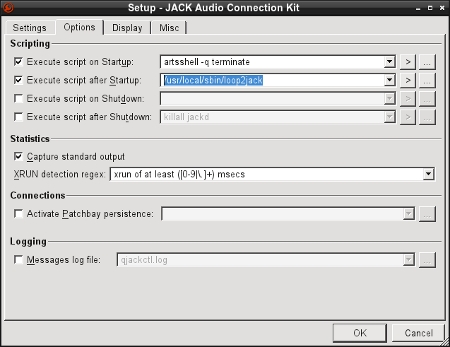
Configuring Jack Audio to use the ALSA loopback device.
Routing WebSDR Audio to Digital Decoding Software
After configuring the computer as shown above, reboot to clear the old audio configuration.
In this example, the very nice Fldigi program will be used as a decoder, for WebSDR sites loaded in Firefox. Fldigi can be obtained from the W1HKJ website or downloaded from regular Linux software repositories. Windows applications can be used in WINE, and audio can be fed to virtual machines for more flexibility. Truly, with Linux and Jack there are few limitations to routing and using any audio on the computer.
After rebooting the computer, start the Jack Audio control interface and start the server. Press the "Connect" button and look for the capture and playback loops. The audio from WebSDR pages will appear at "cloop" and should be connected to "system" to hear the audio on the system speakers or headphones.
Start FLdigi and go into the configuration menu. Select the tabs AUDIO and DEVICES. Check the PORTAUDIO box and select CLOOP for the capture device. As for the playback device, PLOOP works fine, but it is also okay to select the system's soundcard - sending the output straight to the speakers. During testing on a recent version of AVLinux, selecting SYSTEM for the capture and playback devices resulted in succesful reception of audio signals.
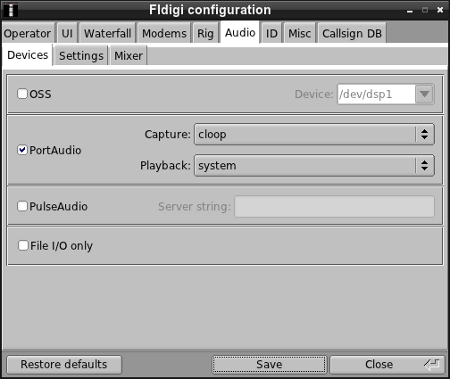
Configuring Fldigi to use Jack Audio routings.
Reception of digital radio modes from a WebSDR site is similar to using a local transciever. For example, tuning the W4AX WebSDR to 14.070 (in upper sideband mode) reveals plenty of psk-31 signals when the 20 meter band is open. In FLdigi, one can see that the receiver gain is set rather high, with lots of background noise and rather weak signals activating the AGC. QRM is easy to eliminate by narrowing the WebSDR filter bandpass. OLIVIA and MT63 are also easy to find and decode - simply go to the calling frequencies and wait for a signal. An added benefit of using a separate digimode decoder is being able to see greater detail in a narrow band than available on the WebSDR waterfall display. Feeding the audio to SpectrumLab (using WINE under Linux) provides excellent spectrum analysis capability.
For the best bandwidth and overall performance with your digital radio system, give thought to using a high definition audio interface.
Radio technology is continuing to advance along with computer networking and audio technology. WebSDR sites have jumped ahead, offering the ability for numerous users to simultaneously enjoy high quality reception of radio signals all over the world. By using software designed to route audio data within a computer, it is possible to use digital radio modes not built into the WebSDR interface. The technology also makes it possible to make bit perfect recordings of signals from online radio receivers or other streaming audio sources. The method given above is not the only way to electronically patch a web radio into digimode software, but it works efficiently and reliably. Now, go out there and tune some digimodes!
© 2005 - 2026 AB9IL.net, All Rights Reserved.
Written and curated by Philip Collier / AB9IL.
About Philip Collier / AB9IL, Commentaries and Op-Eds, Contact, Privacy Policy and Disclosures, XML Sitemap.